


This post originally appeared as an article in the Levvel Resource Library.
Source code for the end-result of the demo can be found here.
About Single Page Applications
Single Page Applications (SPAs) are the modern solution to deliver feature-rich user interfaces for web applications. Recent developments to SPA frameworks enable server-side rendering to improve search engine optimization and initial load times, two of the major criticisms of such frameworks. One great advantage to serving a SPA is that the SPA can be served as a static asset. SPAs can be served reliably, quickly, and inexpensively via a combination of cloud simple storage (such as AWS S3) and a Content Delivery Network (CDN) (such as AWS Cloudfront). For example, https://www.your-single-page-application.com can be hosted via AWS S3, Route 53, and Cloudfront for as little as $0.50/month. Costs and complexity are reduced by eliminating the need for a dynamic web application server (i.e. NodeJS running Express).
What’s Hard About Accessing Dynamic Data from a Statically-Served SPA?
Serving an SPA from a static asset server has many benefits, but also creates a security challenge when you require the application to dynamically handle private data (i.e. when you interact with privately-stored user data after the user is authenticated). Such data is often exposed through public APIs that only allow access to authorized applications and users (see: Google, Facebook, Stripe, etc.). The OAuth 2.0 protocol is one of the most commonly used and known set of guidelines for authenticating HTTP requests via publicly-exposed APIs. The OAuth2 Authorization Code Grant process often requires an application to submit a client_secret as part of the protocol. The client_secret is unique to the application, and should never be shared or exposed. The requirement to hide the client_secret is a challenge for statically-served web applications.
OAuth2 Authorization Code Grant Overview
Traditionally, a dynamic application server (i.e. NodeJS running Express) will store an application’s OAuth2 credentials (the client_secret) as environment variables. Node exposes these variables via the process.env property. When an application owner stores application secrets on the server process, the application can read the client_secret value from the server environment without exposing that value to the public. Remember that the client_secret is often required for the authorization workflow, and should never be exposed publicly in the application code.
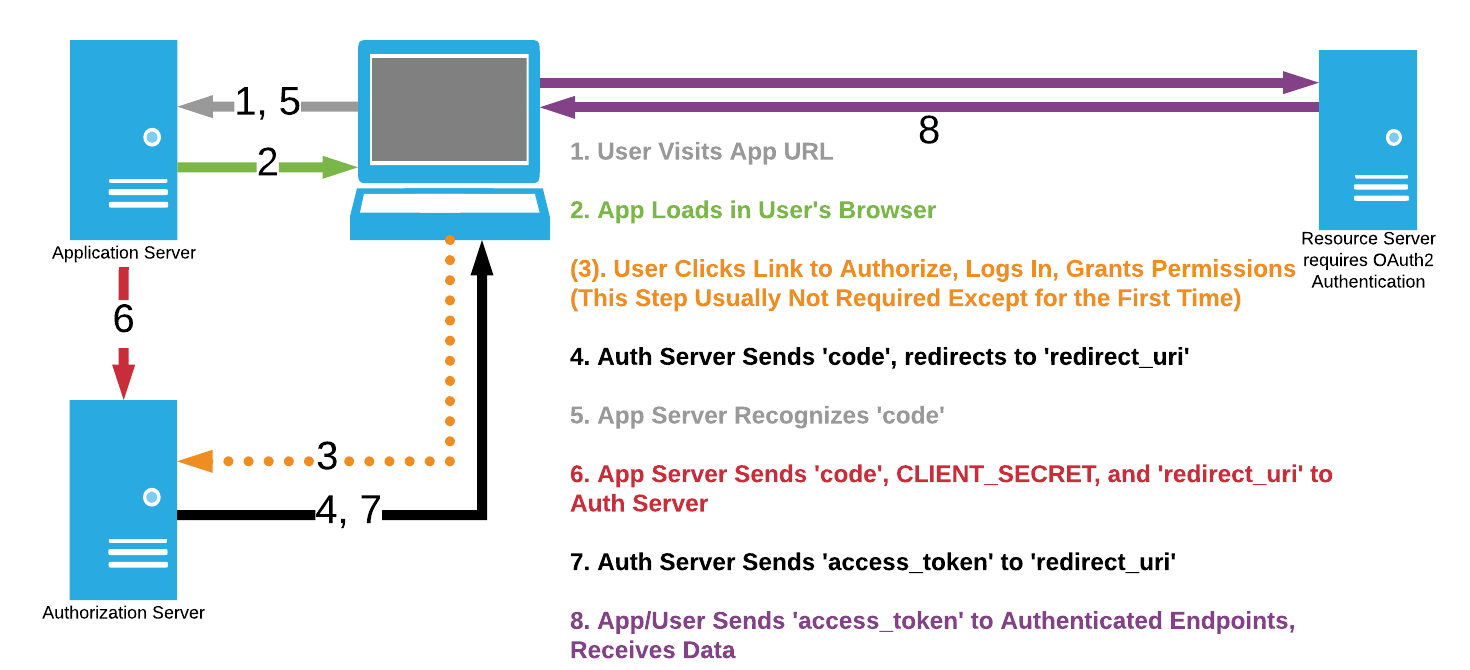
Figure 1 - OAuth2 Workflow for Authorization Code Grant, using a Dynamic Application Server
The Authorization Code Grant depicted in the diagram above is dependent on three-way communication (hence the name Three-Legged OAuth2). The application server receives the code parameter from the running application (step 5), and subsequently send a request including the client_secret directly to the authorization server, without going through the user’s browser (step 6). This is the expected functionality when the application is a confidential client; however, SPAs are public clients (specifically, user-agent applications). Statically-served SPAs are not designed to protect any application secrets (such as the client_secret). A static asset server handles two-way communication; it will not handle the three-way communication depicted by steps 4, 5, 6, and 7 above.
A Note on Other Appropriate OAuth 2.0 Protocols
The OAuth2 protocol describes several types of grant types. This post focuses on using the Authorization Code Grant with a Confidential Client. Other OAuth2 protocol specifications were designed for use in mobile, native, and single-page applications. These are scenarios where the client_secret confidentiality is not guaranteed.
One option to consider is the Implicit Grant. The Implicit Grant is not as widely offered, and it does not provide identity verification (whereas the Authorization Code Grant does). If your use case allows for use of the Implicit Grant, and it is implemented by your target API, then check out the Implicit Grant documentation.
Another option is the Authorization Code Grant, but with a Proof Key for Code Exchange (PKCE). Primarily used in native and mobile apps, PKCE usage is designed for public clients. Unfortunately, is not as widely supported by providers (as using PKCE requires additional support by the authorization server).
This post does not cover implementation of these other OAuth2 options - instead, it demonstrates that a Function-as-a-Service can be used to perform the application server’s role in the Authorization Code Grant protocol. This is not a use case that is considered in most literature surrounding the OAuth2 Authorization Code Grant protocol. It is specifically applicable to APIs that require a client_secret during the authentication process, and that also provide little or no support for OAuth2 protocols which are designed for public client use. Regardless, the solution put forth in this writing provides a similar level of security as when the Authorization Code Grant protocol is implemented with a confidential client (i.e. a dynamic application server).
For more information about when each grant can be used, check out this post on Medium.
So, What’s at Stake for a Statically-Served SPA?
An application served via static storage (such as the $0.50/month solution mentioned above) does not have the ability to facilitate three-way communication to complete the authentication process described in the OAuth2 Authorization Code Grant. Therefore, in order to complete the three-legged process, the application would need to perform step 6 above. Step 6 requires sending the client_secret to the authorization server, and the application would have to initiate this from the user’s browser. This step would cause a security vulnerability (because the client_secret should never be exposed publicly). Techniques (very bad ideas) exist which attempt to hide credentials such as the client_secret within application code. Some examples of these techniques include the concatenation of credentials to the end of asset identifier strings, or the use of an encryption algorithm with the encryption key stored elsewhere in the application. However, these techniques can be hacked. Using insecure, ill-designed strategies will eventually result in theft of your application secrets.
Theft of application secrets results in a liability for you, the application owner. If a malicious party obtains your registered application secret for OAuth2 authentication, then stealing all your user’s API-exposed data (from the provider API - Slack, Google, etc.) becomes a trivial exercise. This data breach would be 100% your fault; Securely handling privileged application credentials is the application owner’s responsibility. It is impossible to securely hide a private value (such as client_secret) within statically-served SPA code.
Using a Function-as-a-Service (AWS Lambda) to Handle Private Details
So, what do we do if we want our application to access APIs that use OAuth2, but we also want the cost benefits, reliability, speed, and simplicity of serving our application via static storage solutions and a CDN? When using OAuth2 to make API calls from a serverless application, how can you successfully grant your application user an API token without exposing your SPA API secret?
Functions-as-a-Service (FaaS), such as AWS Lambda, provide a great avenue to solve our problem. Performing the token retrieval and renewal with a FaaS such as AWS Lambda is cost-effective, reliable, inherently scalable, and easier to maintain/update than a server instance. This post will provide an example of OAuth2 user authentication and access_token grant, while hiding the SPA application secret behind AWS API Gateway and AWS Lambda.

Figure 2 - OAuth2 Flow for Authorization Code Grant, using AWS Lambda with a Static Server
Why the Focus on OAuth2 and AWS Products/Services
This post covers the narrow intersection of OAuth2 with statically-served Single Page Applications served via AWS S3 and AWS API Gateway. The world of serverless application structure and authentication has so many more topics of worthy (and very related) discussion that I won’t be addressing, such as OpenID Connect, and competitors to AWS services (such as Azure Storage). There are compelling reasons why the difficult intersection of the chosen topics is particularly worth examining separately from broader subjects of authentication and statically-served applications. Simply put, my choices are based on a few major factors:
- AWS provides great documentation
- AWS provides a free service tier with easy setup and use
- AWS provides useful and relevant developer tools
- OAuth2 is a well-proven authentication standard which is relevant to many applications
Solution Overview
This post will walk through several steps to achieve our goal of OAuth2 authenticated calls to a public API. The prerequisites are related to:
- API Credentials
- AWS Credentials
- Docker
- Node, NPM, and Angular CLI
- AWS SAM CLI
The final code for this demo application (and Lambda function) can be found here.
Prerequisites
API Credentials
The example of this post uses the GitHub V3 API. GitHub V3 uses the OAuth2 protocol to authenticate users and web applications, and this requires the registration of your application in order to obtain a Client ID and Client Secret
This example also assumes that you are a registered GitHub user, as you will be logging into GitHub in order to authorize your own application, complete the authentication process, and receive an access_token.
AWS Credentials
AWS Credentials are required to set up and use AWS Lambda services. A basic familiarity with AWS Lambda is also required. Those who are starting from a position of zero familiarity with AWS Lambda (as I did) can find an awesome resource in the Serverless Application Model Simple App.
Docker
You must have Docker installed for the SAM CLI to run. Docker Community Edition is a free download.
Node, NPM, and Angular CLI
Since this post is explicitly describing authentication in the context of serverless applications, we’ll install dependencies with npm. We’ll also be using the Angular CLI to generate an Angular 6 application and components.
AWS SAM CLI
We will use the AWS SAM CLI to build and run our AWS Lambda function in our local environment, before uploading it to AWS and providing access via an API Gateway public endpoint.
Tip: Installing the AWS SAM CLI is easier with npm than with pip. The AWS documentation suggests using pip, but I ran into problems and lengthy work-arounds when trying to use pip. Trying to install Python/pip is particularly difficult because Homebrew installs Python 3.7, with no other versions available. The required Python version for SAM CLI installation is 3.6. You’ll need a different solution than Homebrew to install Python 3.6 and the associated pip.
Running npm install -g aws-sam-local worked flawlessly for me. The SAM CLI version installed is old, but adequate for our needs.
Running Lambda Functions Locally
Once the SAM CLI is installed, create a directory for your local playground (mkdir my-auth-playground && cd my-auth-playground). We need to define the API endpoint in a template.yaml file, so go ahead and create a template.yaml file and paste this code:
AWSTemplateFormatVersion : '2010-09-09'
Transform: AWS::Serverless-2016-10-31
Description: My first serverless application.

Resources:

  Products:
    Type: AWS::Serverless::Function
    Properties:
      Handler: lambdaFunction.handler
      Runtime: nodejs8.10
      Events:
        authToken:
          Type: Api
          Properties:
            Path: /authToken
            Method: any
Notice the “Runtime” and “Handler” properties. This example will use Node 8.10 to execute the function, and ES6 JavaScript as our language of choice. AWS Lambda provides multiple execution languages/environments - see the official documentation for available choices.
In our example, the SAM CLI is going to look for the AWS Lambda Function on an exported property called handler from a file named lambdaFunction.js. Let’s make sure those exist. Create lambdaFunction.js and paste this skeleton of an AWS Lambda handler function:
'use strict';

exports.handler = (event, context, callback) => {
    let response = {
      prop1: "My Best Attribute",
      prop2: "My Not-So-Best Attribute"
    }

    callback(null, {
      statusCode: 200,
      headers: {
        "Access-Control-Allow-Origin: "*"
      },
      body: JSON.stringify(response)
    });
}
Note: Before you deploy this function to AWS Lambda in front of a publicly exposed endpoint, you’ll want to change the Access-Control-Allow-Origin value to match your application domain.
The handler callback expects arguments via the format below:
callback(Error error, Object result)
This is defined in the Lambda Function Handler documentation.
These two files are all you need to start developing your Lambda function and API Gateway locally. Now, start Docker, and from your terminal run sam local start-api. The SAM CLI will start a server at localhost:3000 with an endpoint at /authToken - this is the endpoint we defined above in template.yaml.
Once the SAM api is running, open your browser and navigate to localhost:3000/authToken. AWS starts a node runtime and runs your handler function behind the scenes, but eventually your browser will load the page with “This is my Lambda function” as the body of the document. This is the body property that you defined in the arguments to the callback of your Lambda function.
OAuth2 - Reviewing the Single Page Application Problem
Figure 1 - OAuth2 Workflow for Authorization Code Grant, using a Dynamic Application Server
Figure 1 is shared again here to demonstrate the most common way of implementing OAuth2 Authorization Code Grant with a dynamic application server.
We will implement a solution that follows the flow of Figure 2, shared again below.
Figure 2 - OAuth2 Flow for Authorization Code Grant, using AWS Lambda with a Static Server
In order to aid understanding, and to provide an overview of the rest of this post, a diagram is provided below which describes how we will comprehensively build a demo application that operates according to Figure 2.

Figure 3 - Diagram showing the steps to build the demo described here
Create a UI for simulation
This section will use a small, single-component Angular app to demonstrate the integration of your Single-Page Application, AWS API Gateway, and your AWS Lambda function. You don’t have to use an Angular app - the fundamentals of the process are transferrable to other single-page application frameworks. Use React, Vue, etc. as you please.
If you don’t have the Angular CLI installed, run
npm install -g @angular/cli
Once installed, run
ng new oauth2-app
After the app is initiated, run
cd oauth2-app && ng serve
Open your browser to localhost:4200 and you should see “Welcome to app!” with an Angular logo, and some default links. Let’s delete this content and start integrating the OAuth2 process!
Obtain OAuth2 User Authorization
This section will cover steps 1-4 in the OAuth2 process described above.
Inside your Angular app, open the app.component.html file and delete all the content. Paste this simple layout with a link to the API authentication:
<div style="text-align: center">
  <a href="https://github.com/login/oauth/authorize?client_id={{clientId}}&redirect_uri=http://localhost:4200">Authenticate via GitHub</a>
</div>
replace the '{{clientId}}' string with your API credentials Client ID from the application registration process
If you did not yet register an application to follow along, I recommend using GitHub’s API as a reliable and simple option.
When you save the file changes, your Angular server will automatically refresh the changes. Go to localhost:4200, and click your new link to be taken to the GitHub authorization page. Go ahead and sign in! With luck, you’ll be redirected back to your Angular app. If not, check that your redirect_uri URL param is exactly http://localhost:4200.
When you are redirected back to your Angular app, you will notice that a code param has been added to the URL.
To get the code from our url params, we need to use the ActivatedRoute interface provided by the @angular/router module. To keep our code clean, we are also going to generate a new component to handle the UI features that occur during and after OAuth2 token exchange. Create the new component within the oauth2-app folder:
ng g c authorized
Update the code related to the RouterModule into your app.module.ts file:
import { BrowserModule } from '@angular/platform-browser';
import { NgModule } from '@angular/core';
import { RouterModule } from '@angular/router';

import { AppComponent } from './app.component';
import { AuthorizedComponent } from './authorized/authorized.component';

@NgModule({
  declarations: [
    AppComponent,
    AuthorizedComponent
  ],
  imports: [
    BrowserModule,
    RouterModule.forRoot([
      { path: 'auth', component: AuthorizedComponent }
    ])
  ],
  providers: [],
  bootstrap: [AppComponent]
})
export class AppModule { }
The RouterModule.forRoot() method defines the /auth endpoint and tells the Angular app to launch the AuthorizedComponent for that path. Now, we need to define the place in the UI where the router will render the component. We will tell the router to render route components below our current content. Modify your app.component.html file to redirect the login to http://localhost:4200/auth and to provide a router outlet:
<div style="text-align: center">
  <a href="https://github.com/login/oauth/authorize?client_id=0f09aa44cebc9847d642&redirect_uri=http://localhost:4200/auth">Authenticate via GitHub</a>
</div>

<router-outlet></router-outlet>
Now open your new component authorized.component.ts, add the ActivatedRoute object and an authCode component property your component, and assign the authCode value to the code URL parameter value when the component is initialized:
import { Component, OnInit } from '@angular/core';
import { ActivatedRoute } from '@angular/router';

@Component({
  selector: 'app-authorized',
  templateUrl: './authorized.component.html',
  styleUrls: ['./authorized.component.css']
})
export class AuthorizedComponent implements OnInit {
  authCode: '';

  constructor(private activatedRoute: ActivatedRoute) { }

  ngOnInit() {
    this.authCode = this.activatedRoute.snapshot.queryParams.code;
  }
}
Whew, that was a lot. Now when you visit localhost:4200 and log in via GitHub, the callback URL path is /auth and the AuthorizedComponent becomes visible. To double-check that we are retrieving the code value correctly, let’s display it on the AuthorizedComponent. Open authorized.component.html and modify the template to look like this:
<p style="text-align: center">
  {{authCode}}
</p>
Now, when you successfully authorize our application from GitHub’s authorization page, you’ll see something like this:

Figure 4 - The SPA reads the 'code' parameter that will be sent to the Lambda function
After User is Authenticated, Call the Local SAM CLI Endpoint to Run the Lambda Function
Alright, here comes the fun part. This is where your Lambda function comes into play. Let’s hook up our UI to our local Lambda function API.
Open the AuthorizedComponent authorized.component.ts - this is where we will call our lambda Function, retrieve a token, and perform authenticated API calls.
We are going to modify the AuthorizedComponent’s NgOnInit() method to call our local server endpoint in front of our Lambda function, and assign the response body to the component property lambdaResponse. Angular will display the response body in the UI upon a successful execution of our Lambda function.
In order to do this, we need to import the HttpClientModule into our application to asynchronously handle the request to localhost:3000/authToken. Add the line
import { HttpClientModule } from '@angular/common/http';
to the app.module.ts, and add it to the imports array. Also import { HttpClient } to the authorized.component.ts file.
Next, let’s modify the AuthorizedComponent. Create a lambdaResponse property on the component, create a private instance of the HttpClient in the constructor() method, and re-write the NgOnInit() method to call a retrieveToken() method. Write the retrieveToken() method so that it calls and subscribes to our localhost:3000/authToken endpoint for the Lambda function. Don’t forget to import { Observable } from 'rxjs'; on the AuthorizedComponent. When you’re done, your authorized.component.ts file should resemble this:
import { Component, OnInit } from '@angular/core';
import { ActivatedRoute } from '@angular/router';
import { HttpClient } from '@angular/common/http';
import { Observable } from 'rxjs';

@Component({
  selector: 'app-authorized',
  templateUrl: './authorized.component.html',
  styleUrls: ['./authorized.component.css']
})
export class AuthorizedComponent implements OnInit {
  authCode: '';
  lambdaResponse = 'Loading...'; // initial value rendered

  constructor(
    private activatedRoute: ActivatedRoute,
    private http: HttpClient
  ) {}

  retrieveToken(code = this.authCode): Observable<any> {
    const reqUrl = 'http://localhost:3000/authToken';
    return this.http.get(reqUrl);
  }

  ngOnInit() {
    this.authCode = this.activatedRoute.snapshot.queryParams.code;

    this.retrieveToken().subscribe(result => {
      this.lambdaResponse = JSON.stringify(result);
    });
  }
}
and your authorized.component.html file can display the response:
<p style="text-align: center">
  {{authCode}}
</p>
<p style="color: blue; text-align: center">
  {{lambdaResponse}}
</p>
We are now returning a response to our UI from our Lambda function callback, via a configuration that will map to AWS API Gateway! Now all we need to do is make the Lambda function handle the logic of the target API code exchange for an authenticated user token.
OAuth2 Access Token Request
When we make the initial call to our Lambda function, we will pass the code url param. We will assign the Client ID and Client Secret in the component for now (Do Not Commit/Push this Code With Your Secret Credentials). We will pull these values from local environment variables upon deployment to AWS.
We will write Node.js executable code to handle the authentication call and return the authenticated user token, which we will pass along in the callback to our Angular app.
The code to do these things looks like this:
'use strict';
const https = require('https');

const github_client_id = "{{YOUR_CLIENT_ID}}";
const github_client_secret = "{{YOUR_CLIENT_SECRET}};

exports.handler = (event, context, callback) => {
  const authCode = event.queryStringParameters.code;

  const tokenEndpoint = "/login/oauth/access_token" +
    "?client_id=" + github_client_id +
    "&client_secret=" + github_client_secret +
    "&code=" + authCode +
    "&accept=:json";

  let response = '';

  const httpOptions = {
    method: 'POST',
    host: 'github.com',
    path: tokenEndpoint,
    headers: {
      'User-Agent': 'Serverless-Oauth2-Example',
      'accept': 'application/json'
    }
  }

  https.request(httpOptions, res => {
    res.on('data', (raw) => {
      response += raw.toString('utf8');
    });

    res.on('end', () => {
      callback(null, {
        statusCode: 200,
        headers: {
            "Access-Control-Allow-Origin": "http://localhost:4200",
            "Access-Control-Allow-Methods": "POST",
            "Access-Control-Allow-Headers": "Content-Type"
        },
        body: response
      });
    })
  })
  .end();
}
and let’s slightly modify our retrieveToken() method:
retrieveToken(code = this.authCode): Observable<any> {
  const reqUrl = 'http://localhost:3000/authToken';

  return this.http.post(reqUrl, {}, {
    params: {
      'code': code
    },
    headers: {
      'Content-Type': 'multipart/form-data'
    }
  });
}
Paste your GitHub client_id and client_secret values into the variable declarations near the top of the file, save your changes, and perform Authentication via GitHub through your Angular app UI. You should be able to pipe the response from GitHub’s authentication endpoint to your application UI! We can see a token coming back from GitHub.

Figure 5 - The SPA retrieves the 'access_token' without refreshing as a result of an asynchronous call to the Lambda function
The code above does not handle errors and does not handle responses other than the “Happy Path” 200 OK scenario, but serves as a starting point for the AWS Lambda function deployment.
Notice that we are whitelisting our http://localhost:4200 endpoint of the Angular application. The domain of the deployed application will need to be whitelisted as well. Setting the HTTP headers above is important to satisfy browser CORS protection.
Deploying the Lambda Function
Deploying the Lambda Function endpoint involves a few steps:
- Log in to the AWS Console
- Add a new Lambda Function with default configurations (in Node.js if you’ve been following this code-along)
- Paste the code from your local SAM function into the Lambda function code editor
- Update the
client_idandclient_secretvariable assignments to read from the Lambda local environment:
const github_client_id = process.env.GITHUB_CLIENT_ID;
const github_client_secret = process.env.GITHUB_CLIENT_SECRET;
- Set the local environment variables (and optionally encrypt them with a custom key from AWS KMS)
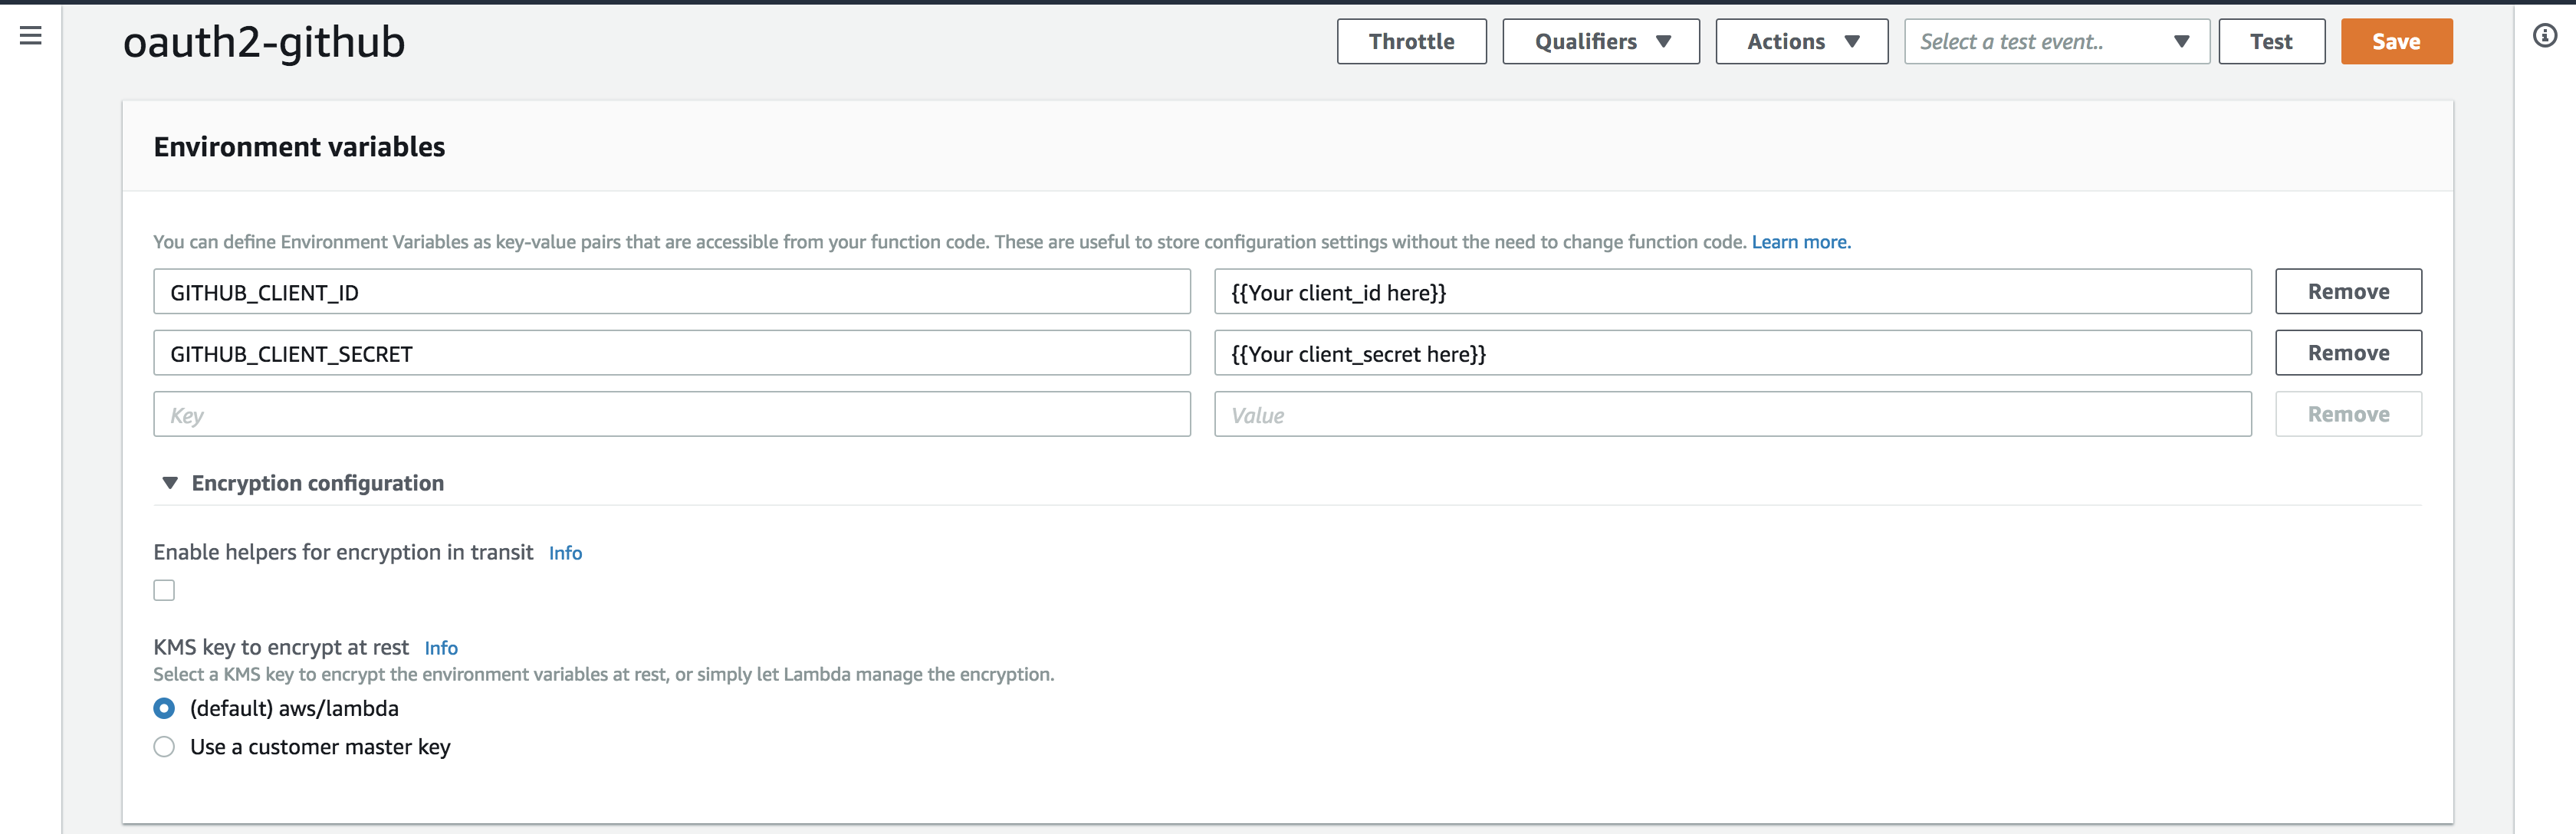
Figure 6 - Encrypting the Lambda function's environment variables, including the 'client_secret'
Setting up a Publicly Exposed API Endpoint
AWS API Gateway allows quick setup of a publicly exposed endpoint to your Lambda function. Go through the quick process of creating a new API that points to your Lambda function (your function name will auto-populate when you go to search for it in the setup process). Also configure validation settings in order to avoid running your Lambda function for invalid requests, thus reducing the compute time and costs to run your Lambda function.
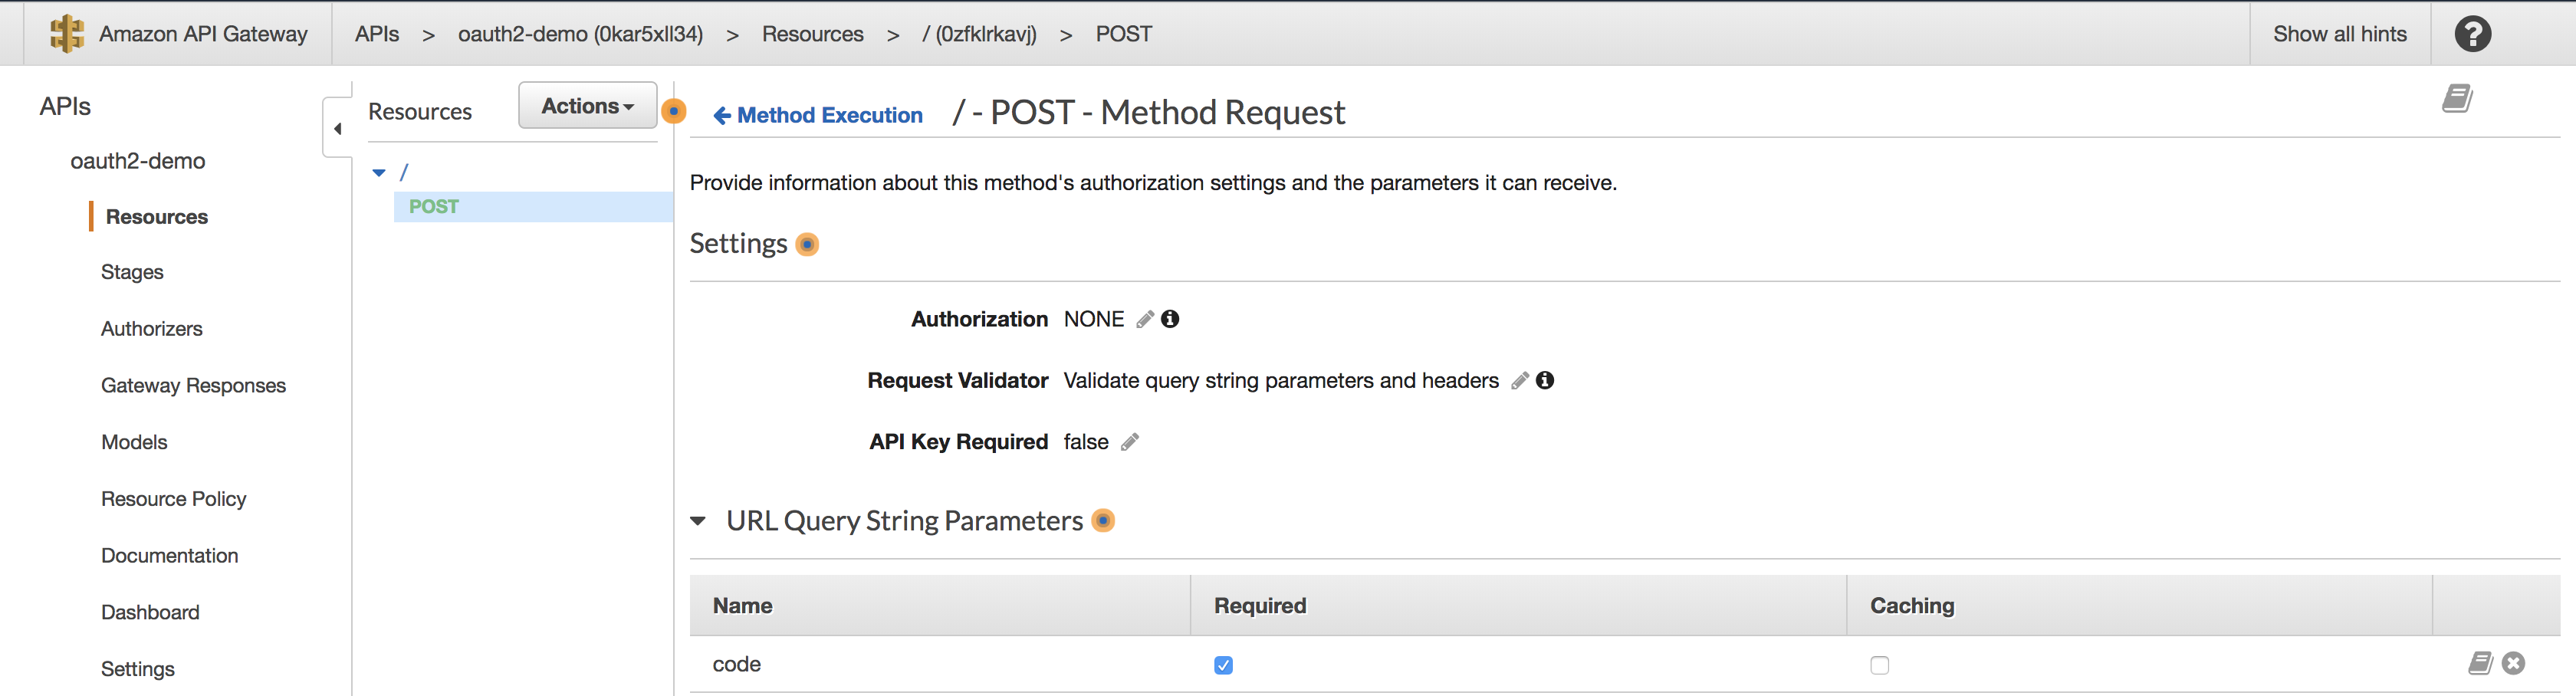
Figure 7 - API Gateway Configuration
I am not a cloud security expert, and I don’t pretend to be one - AWS provides documentation about controlling access to an API Gateway endpoint. It is possible to restrict access to your endpoint via Virtual Private Cloud, Lambda (custom) Authorizers, and other methods. Use them according to your needs.
Once your public endpoint and configuration are set up, deploy the API and copy the endpoint from the Dashboard tab on the left of the API Gateway management screen:
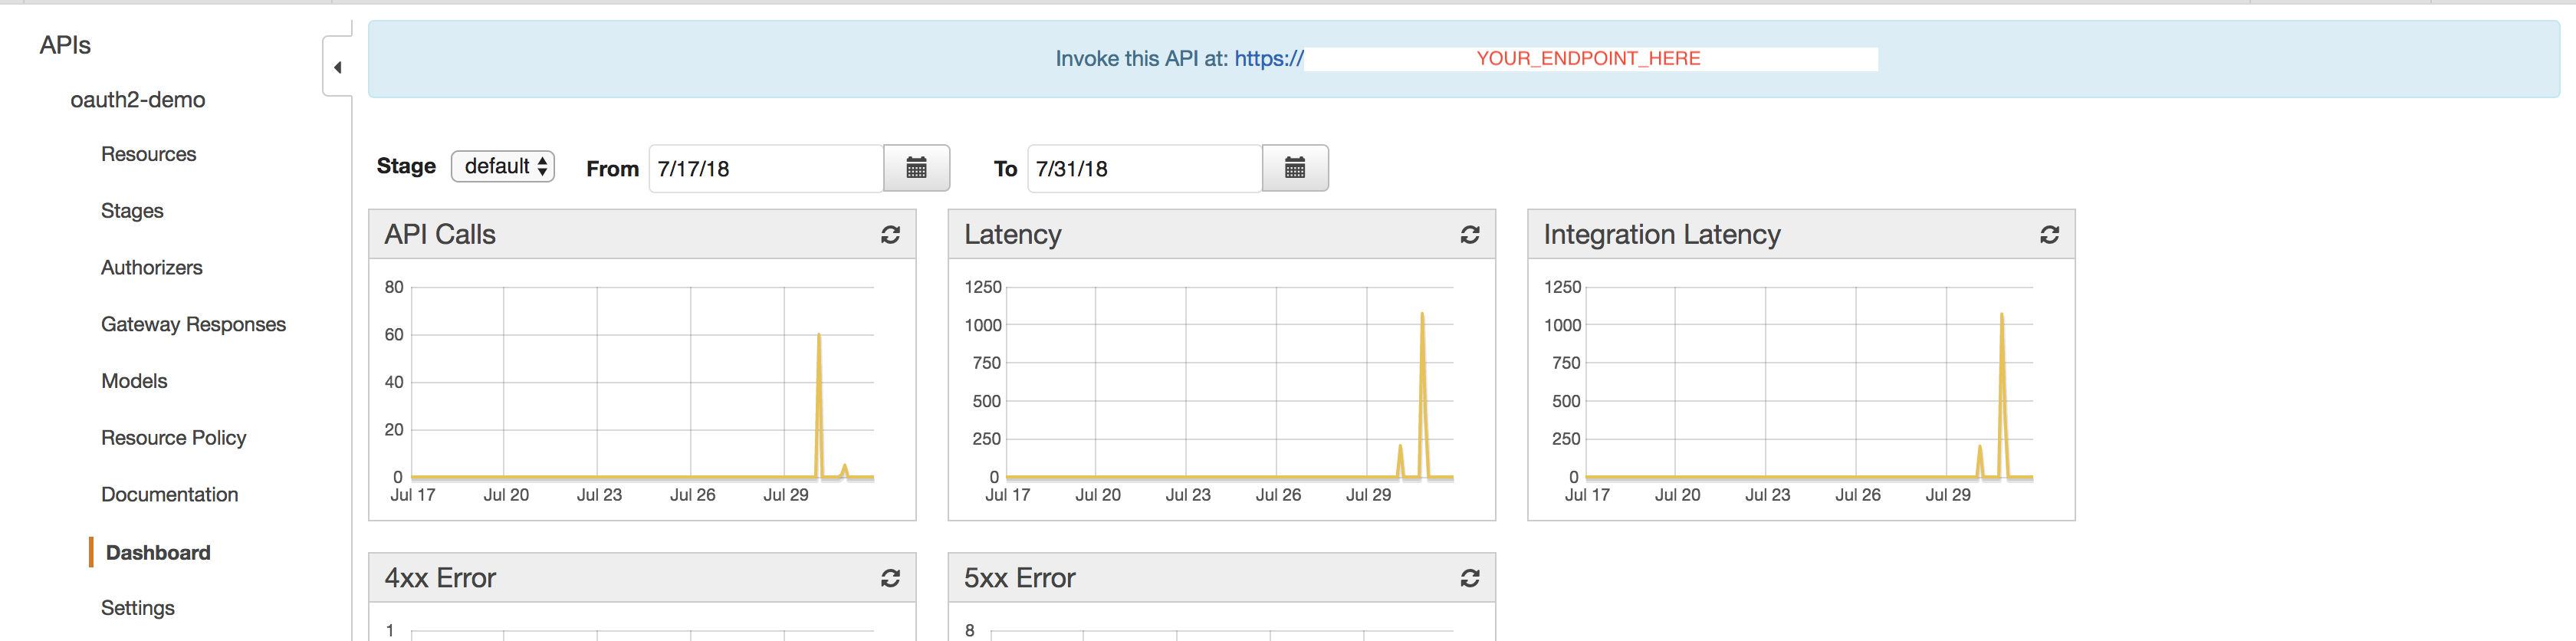
Figure 8 - The public API Gateway endpoint can be viewed via the Dashboard tab
Update your authorized.component.ts file with the new endpoint, and voila! Your application is now fetching the authentication token via your Lambda function, with an entry point via AWS API Gateway.
retrieveToken(code = this.authCode): Observable<any> {
  const reqUrl = '{{YOUR_ENDPOINT_HERE}}';
  return this.http.post(reqUrl, {}, {
    params: {
      'code': code
    },
    headers: {
      'Content-Type': 'multipart/form-data'
    }
  });
}
Final Comments
You can configure the API Gateway and Lambda function to validate and respond to URL path parameters or query parameters. At the end of the day, your Lambda function is simply code that runs when you satisfy the requirements of a request to the configured API Gateway endpoint.
You can also configure the API Gateway and Lambda function to run from one specific region in the US, or to optimize for multiple locations. The full suite of AWS cloud configurations and integrations is at your disposal.
Lambda Pricing is very reasonable - the first 1,000,000 requests per month are free, and requests after that are $0.20 per million.